
 216
216
Overview
This article walks you through how to add, edit, and remove products in the CORE POS inventory system — including setting up product variables, managing stock tracking, enabling online purchases, and removing outdated items.
🎥 Watch the walkthrough:
Or preview it below:
Prerequisites
- Admin access to CORE
- At least one POS product category created
- Barcode or SKU system (optional but recommended for tracking)
Step-by-step instructions
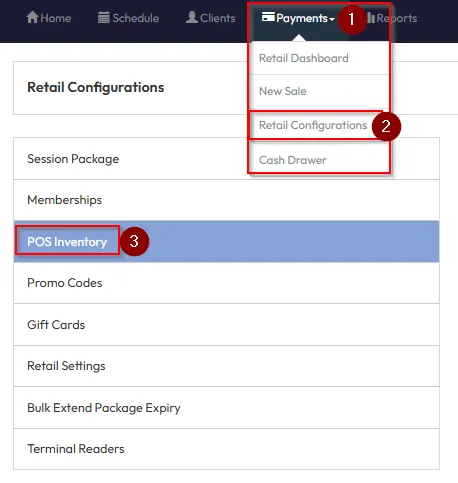
Step 1: Navigate to POS inventory
- Go to Payments > Retail Configurations > POS Inventory.
Step 2: Add a new product
- Click Create New.
- Enter the Product Name (e.g. T-shirt).
- Add a Product Description.
- Choose or create a Product Category (e.g. Apparel).
- Click Edit > Add More to create a new category.
- Upload an image of the product.


Step 3: Add product variables (e.g. size or color)
- Enter a Variable Name (e.g. White Small).
- Set a Price and Tax Setting.
- Add a Barcode or SKU (optional but helpful for tracking).
- Toggle Track Stock ON if you want to monitor inventory.
- Toggle Enable Client Purchase Online ON if the item should be available for sale online.
- Repeat to add more sizes or colors (e.g. Medium, Large).
Tip: Only one of Barcode or SKU can be used per variable — not both.

Step 4: Add inventory stock (if tracking enabled)
- After saving, click the stock quantity (e.g. 0) beside the variable.
- Select Stock Received.
- Enter the quantity (e.g. 50) and click Save.
Tip: Variables with Track Stock ON will appear in reports. Others will show “N/A.”


Step 5: Check product availability in POS
- Go to Payments > New Sale > Products.
- Search for the product (e.g. T-shirt).
- Variables with:
- Track Stock ON + In Stock = Available
- Track Stock OFF + Purchase Online ON = Available
- Track Stock OFF + Purchase Online OFF = Hidden


Step 6: Sell product via POS
- Select product and variable.
- Add to cart and choose a client.
- Proceed to Checkout and complete the sale.
Tip: You can also sell directly from a client profile by selecting New Sale.


Step 7: View stock changes in inventory report
- Go to Reports > Inventory.
- See current stock levels, pricing, barcodes, SKUs, and variable info.
- Items with Track Stock ON will show numerical stock levels.


Step 8: Remove a product
- Go to Payments > Retail Configurations > POS Inventory.
- Locate the product you want to delete (e.g. Bottled Water).
- Click the Bin Icon to delete.
- Confirm the deletion.
Tip: Once deleted, the product is no longer available for sale or visible in inventory.


Expected outcome
You’ll be able to add and manage products in the POS inventory system, process sales, track stock (if enabled), and cleanly remove items no longer in use.
FAQs
Q: Can I track stock for some variables but not others?
A: Yes — each variable has independent tracking settings.
Q: Why isn’t my product showing up in New Sale?
A: Make sure Enable Client Purchase Online is ON and stock is available (if tracking).
Q: What happens when stock hits zero?
A: If Track Stock is ON, the item becomes unavailable in the POS.
Still need help?
Reach out to our support team via [email protected]

