
 375
375
Overview
This article covers how to create memberships and session packages in CORE — and the key difference between the two. Memberships are billed on a recurring basis (e.g. weekly or monthly), while packages are one-time purchases (e.g. a 10-class pack).
🎥 Watch the walkthrough:
Or preview it below:
Prerequisites
- Admin access to CORE
- Understand your billing and credit structure
- Session types already created (if limiting by session type)
Step-by-step instructions
Step 1: Access Retail Configurations
- Go to the Payments tab.
- Select Retail Configurations.
- You’ll see tabs for both Memberships and Single Packages.


Tip: Memberships = recurring billing. Packages = one-time purchase.
Step 2: Create a new package or membership
- Click Create New in the top right corner.
- Select either the Memberships or Single Package tab depending on what you're creating.
- Enter a Package Name — this will appear in the app and on widgets.
- Add a Package Description that’s client-friendly.


Step 3: Assign categories
- Under Package Categories, click the Edit icon.
- Add or select relevant categories (e.g. "Monthly", "Unlimited", "Intro Offers").
- Click Save to confirm.
Tip: These categories help organize offerings on your website and app.


Step 4: Enable online sales
- Toggle Enable Client Purchase Online ON to sell via the app and web.

Step 5: Set billing cycle and length
- Under Billing Cycle, choose how often to bill (e.g. every 2 weeks, monthly).
- Choose a Package Length:
- Select Unending for ongoing billing until cancelled.

Step 6: Set pricing and taxes
- Add the recurring Price (e.g. $120 every 2 weeks).
- Toggle tax settings as needed.
- (Optional) Add a One-Time Setup Fee to the first invoice.


Step 7: Set credit access
- Choose how many credits are included:
- Unlimited or limited (e.g. 1 per week).
- Assign to specific Session Types.
Tip: Use this to tailor access — e.g. unlimited strength classes, but 1 yoga class per week.


Step 8: Configure shared location access
- Toggle Shared Locations ON to allow roaming between studios.
- (Optional) Turn on Minimum Home Usage:
- Set a number of days before roaming access is granted.


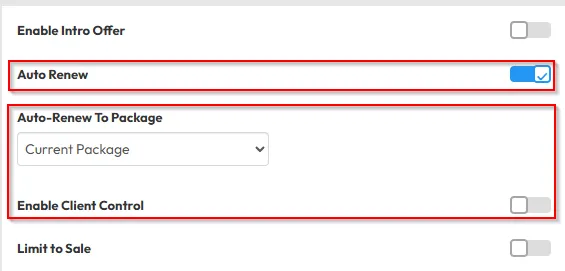
Step 9: Apply limits and offers
- Enable Intro Offer to restrict to new clients.
- Limit to Sale to cap the total number sold (e.g. 50).
- Limit to Purchase to restrict per-client (e.g. 1 per client).
- Client Online Purchase Expiry to set a removal date.


Step 10: Set advanced scheduling (optional)
- Set First Payment Date:
- Set a future start date (e.g. presale or opening day).
- Set First Allocation Date:
- Controls when credits become active.
Tip: These are often used during presales to delay billing and access.

Step 11: Configure cancellation settings
- Toggle Minimum Cancellation Term ON to lock in members for a set period.
- (Optional) Add a Cancellation Fee (e.g. $50).
- Toggle Enable Clients to Cancel Membership to allow self-cancellation via the app.

Step 12: Add alerts and agreements
- Use Package Expiry Alert to notify clients about credit expiry.
- Toggle Enable Access to CMS if your business uses Cast.
- Add a Package Agreement if you want clients to agree to T&Cs.


Step 13: Finalize and publish
- Review all settings.
- Click Add Package to go live!
Expected outcome
You'll have a membership or session pack live and available for purchase, fully configured with billing, access rules, and online visibility.
FAQs
Q: Can I sell the same package across multiple locations?
A: Yes — enable Shared Locations and optionally set a minimum home usage term.
Q: How do I run an intro promo?
A: Use the Enable Intro Offer toggle and set sale or purchase limits as needed.
Q: What happens if I don’t set a start date?
A: The membership becomes active immediately upon purchase.
Still need help?
Reach out to our support team via [email protected]

