
 47
47
Benefits of Stripe Terminal
Hapana will be offering the Stripe Terminal to our customers to collect in-person payments via the Stripe Reader S700 reader. See benefits of using Terminal below:
-
Unified Commerce
-
Unified online and in-person payments experience (all through Hapana)
-
One provider for reconciliation and reporting for all transactions
-
Collect customer data across all channels, providing holistic view of purchasing behavior (loyalty, churn prevention, identifying likely behavior from one-time to recurring)
-
-
Security: The new readers are EMV-certified, which makes our data more secure and reduces liability for any potential fraudulent charges
-
Reliability: EMV transactions are more reliable, seldom requiring an additional card dip (versus swipe readers that require multiple attempts)
Benefits to you as a Hapana Customer
-
Liability shift - Stripe readers are EMV levels 1,2,3 certified. You will benefit from an EMV liability shift that removes your liability for all EMV transaction disputes with the reason code “fraudulent.”
-
Owning the in-person experience - you can customize email receipts and ensure the end cardholder has the same positive, brand-associated experience that they’ll have checking out on your website.
-
Future proofing - magstripe technology is going away; by using Stripe’s EMV certified readers, you are leveraging cutting-edge technology.
Getting Started
Stripe Reader S700 is an Android-based smart reader for countertop and handheld use. The Stripe Terminal SDK connects to the reader over the internet, LAN, or handoff mode.
It supports EMV chip and tap transactions and magnetic-stripe swipes. In the future we will explore the ability to customize the on-reader checkout experience using a suite of pre-built and custom elements. This could include an upload of a custom reader splash screen and show line item details on the screen during the transaction.
Note: Stripe hardware can only be shipped to twenty three countries. The devices cannot be shipped to PO boxes.
Payment types: Magstripe, Chip (EMV), Contactless (EMV + NFC)
Connectivity: WiFi and Ethernet
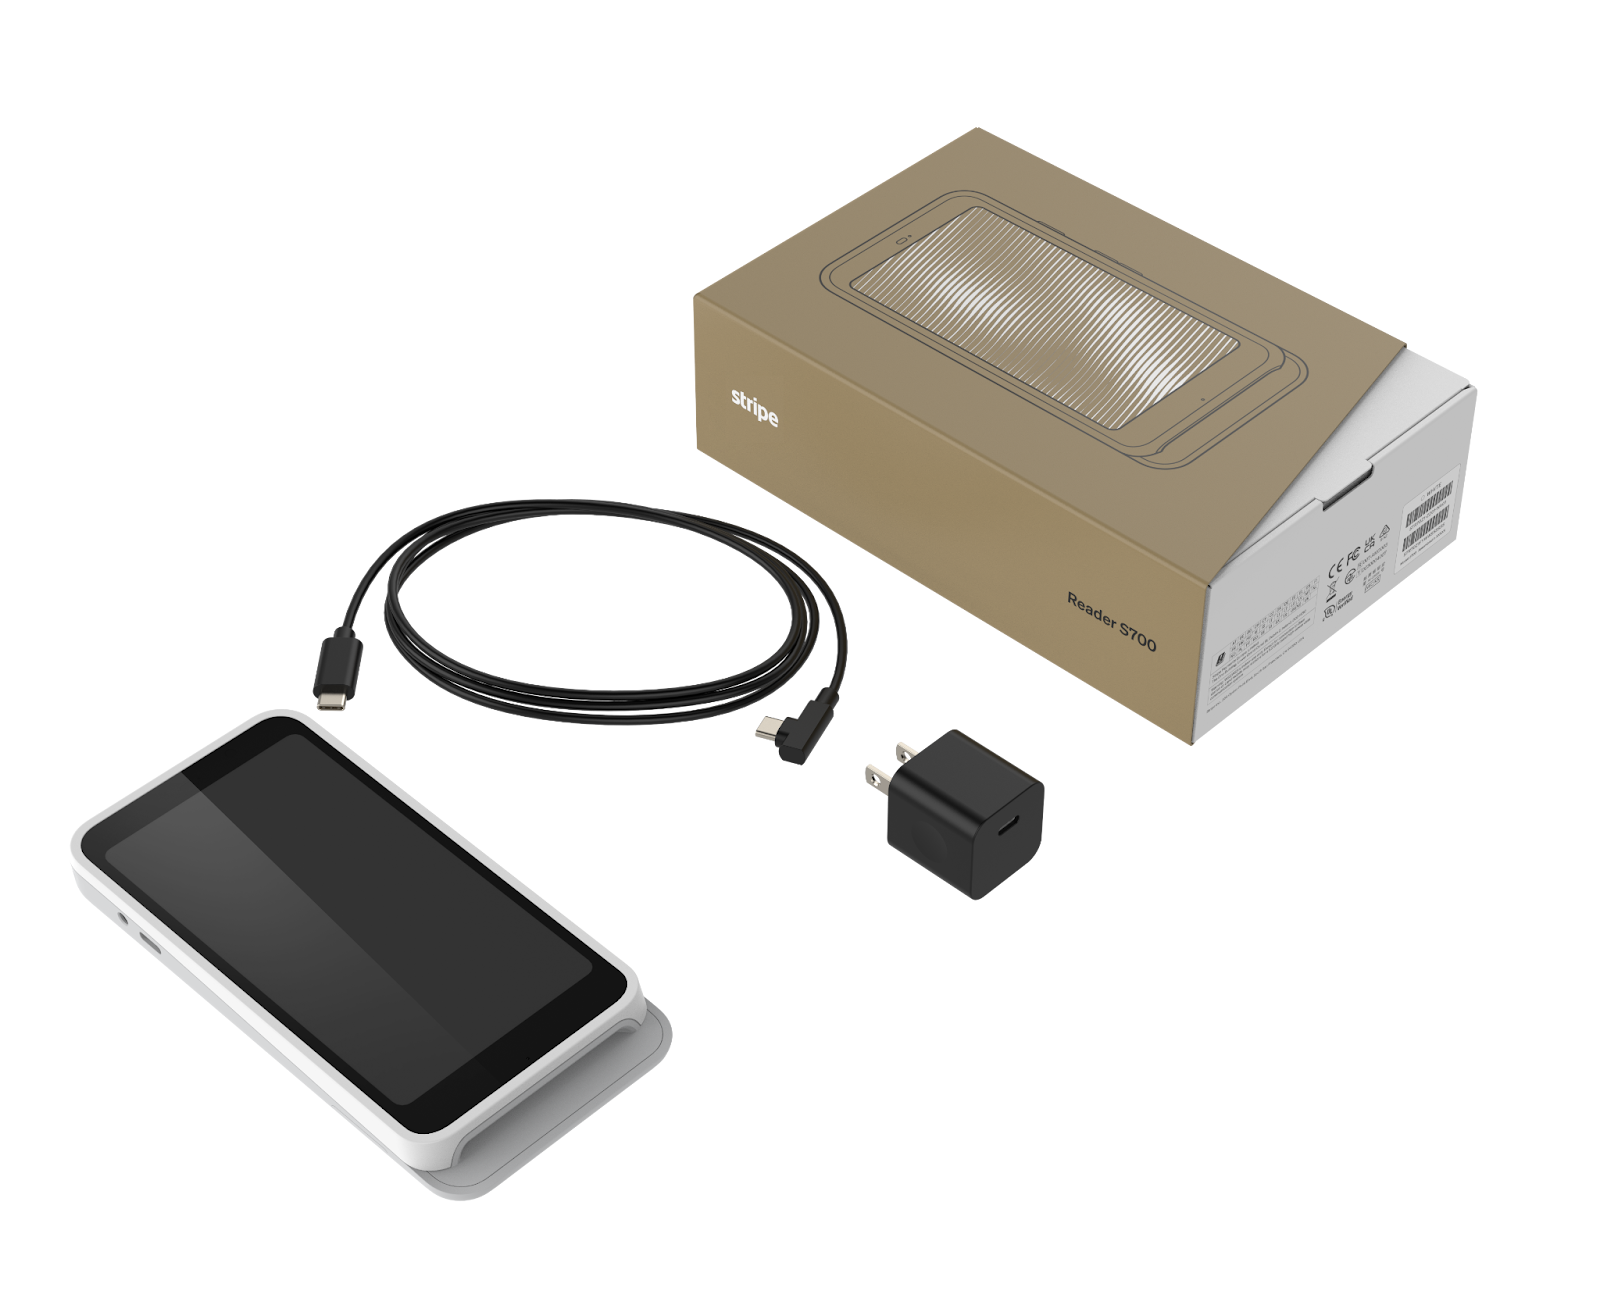
In the box:
-
Stripe Reader S700 Card Reader
-
USB-C to USB-C charging cable
-
Power adapter – shipped with S700
(Optional) Ethernet - Ethernet connectivity requires an optional hub, which provides wired 10/100 Ethernet connectivity and allows your smart reader to remain fully charged with the included charging cable. The hub also provides two USB-A ports to connect peripherals such as a barcode scanner and printer. The hub is compatible with the S700 Dock for countertop applications.
Setting up your Reader
Follow these steps in the following sequence to set up your reader:
-
Turning the reader on and off:
-
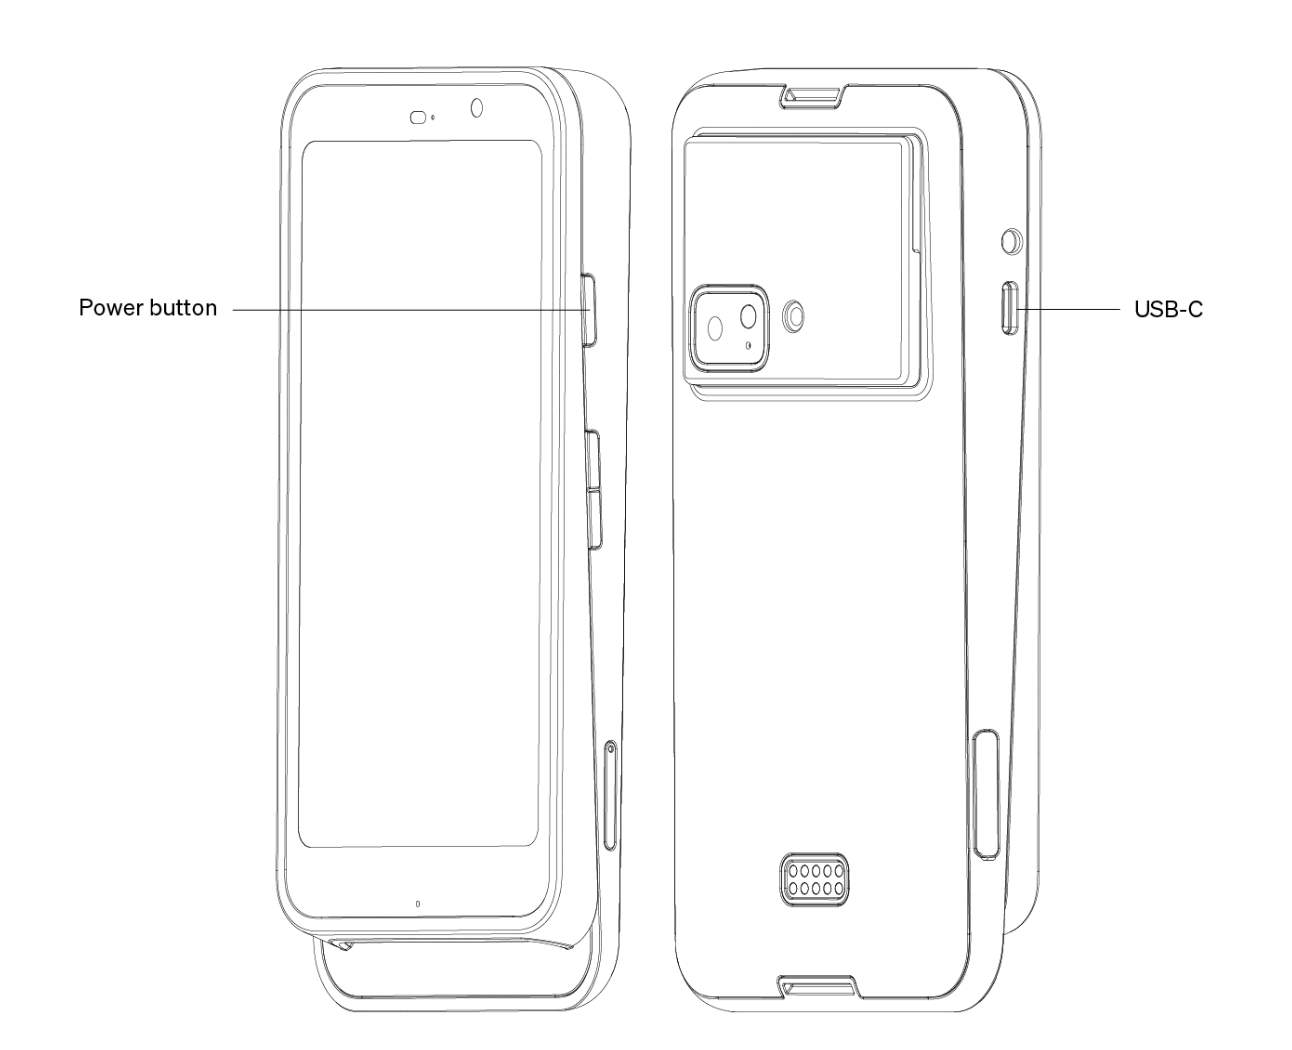
Connect the reader to power by plugging the provided USB-C cable into the port on the left side of your reader.
-
Connect the opposite end of the USB-C cable to the provided power adapter and plug it into a power outlet.
-
After the reader is fully charged, hold down the power button on the right side until the screen turns on.
-
After the device powers on, press the power button to sleep or wake the device.
-
To fully power off the device, hold down the power button until the power off option appears on the screen, then select it.
-
In a countertop deployment, leaving the device on for extended periods is expected. With a full charge, you can expect the battery to last about 15 hours. Even when not in use, leave Stripe Reader S700 plugged in and powered on to receive automatic software updates.
-
-
Accessing Settings
-
To open the settings menu swipe right from the left edge of the reader screen to reveal a settings button.
-
Tap the settings button and enter the admin PIN 07139.
-
From here you can update your WiFi settings or generate a pairing code for device registration.
-
Battery percentage is displayed at the top right of this screen.
-
To close the settings screen click the back arrow in the top left corner.
-
-
Connecting the reader to the internet: Because the Stripe Reader S700 is a smart reader, its reader software communicates directly with Stripe. Your point-of-sale application in Hapana Core then communicates with the reader through the internet (using the server-driven integration). If you’re running into issues connecting your reader to the internet, follow the troubleshooting steps to diagnose the issue.
Connecting to your Reader
Now that you’ve set up your reader and are connected to the internet, you can now connect your reader to the POS application, by following the steps below:
-
Connect your reader- Navigate to Core > Payments > Retail Configurations. Here you will find a new menu item on the left called Terminal Readers.
-
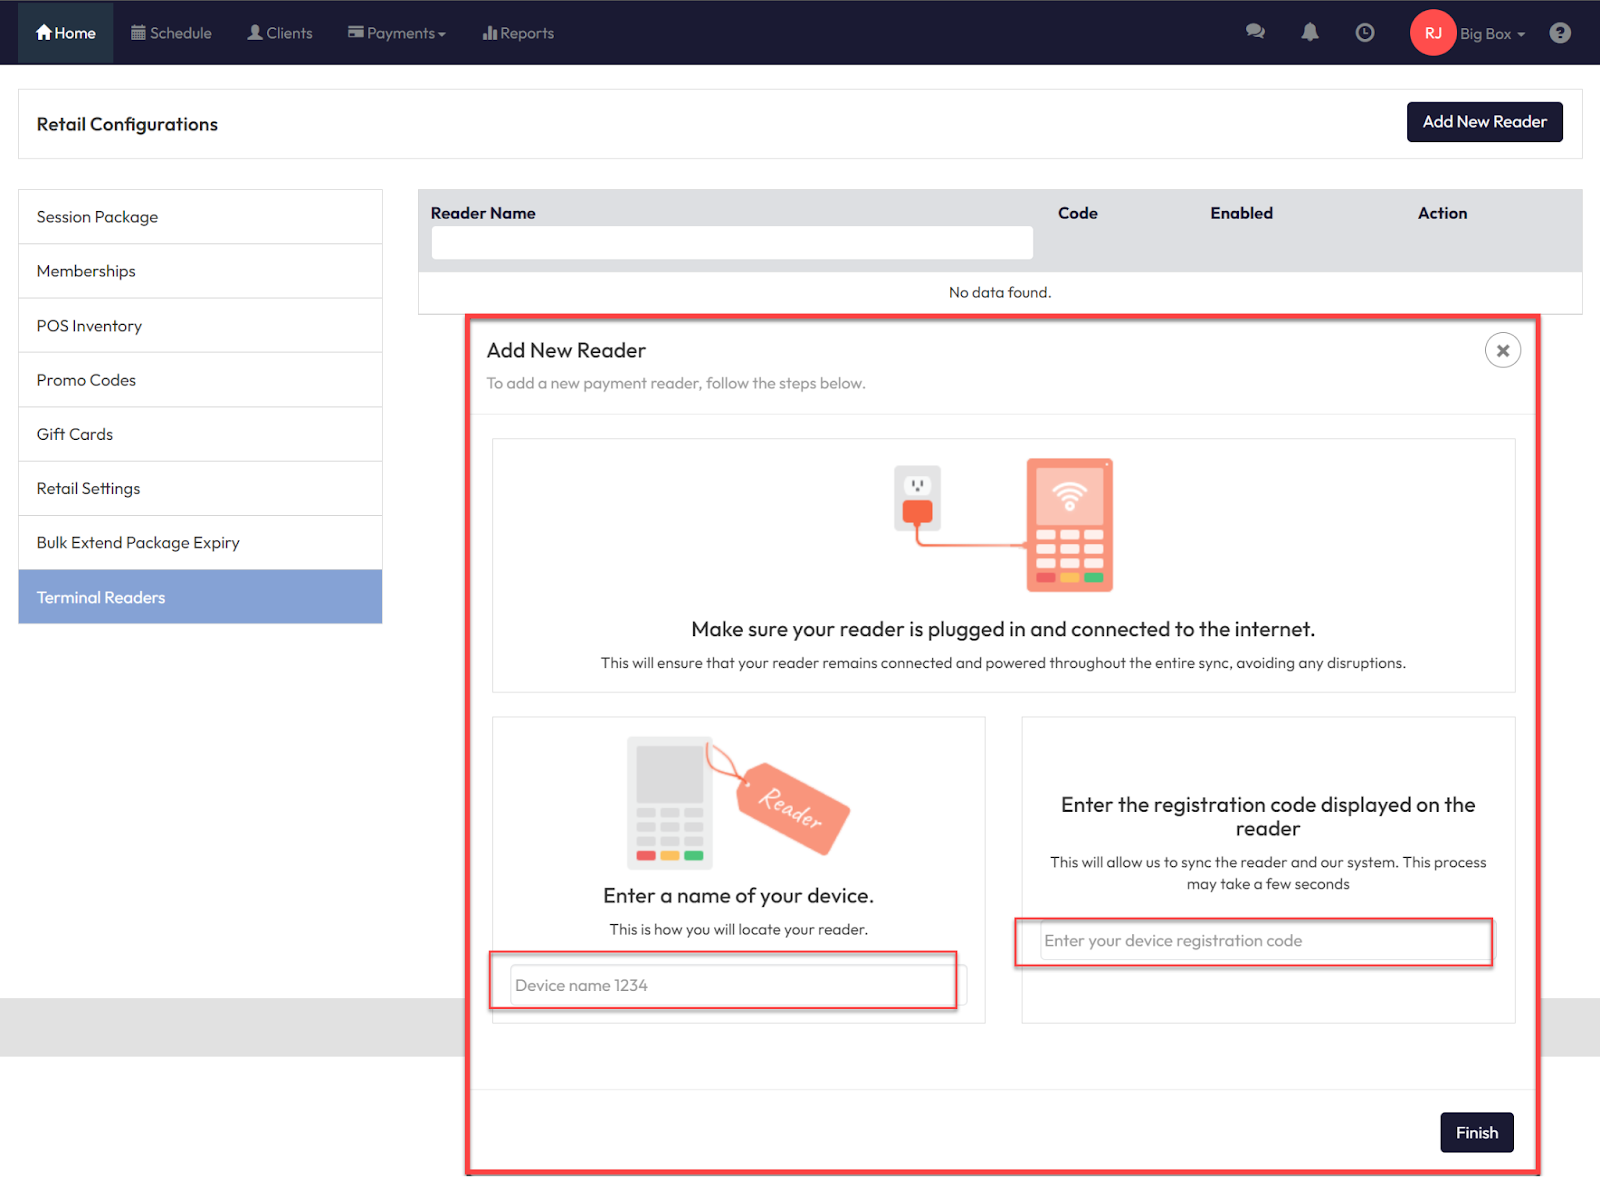
Click the Add New Reader button in the upper right corner.
-
-
Core will present an install screen where you must enter a Device Name and the code on the device itself.
-
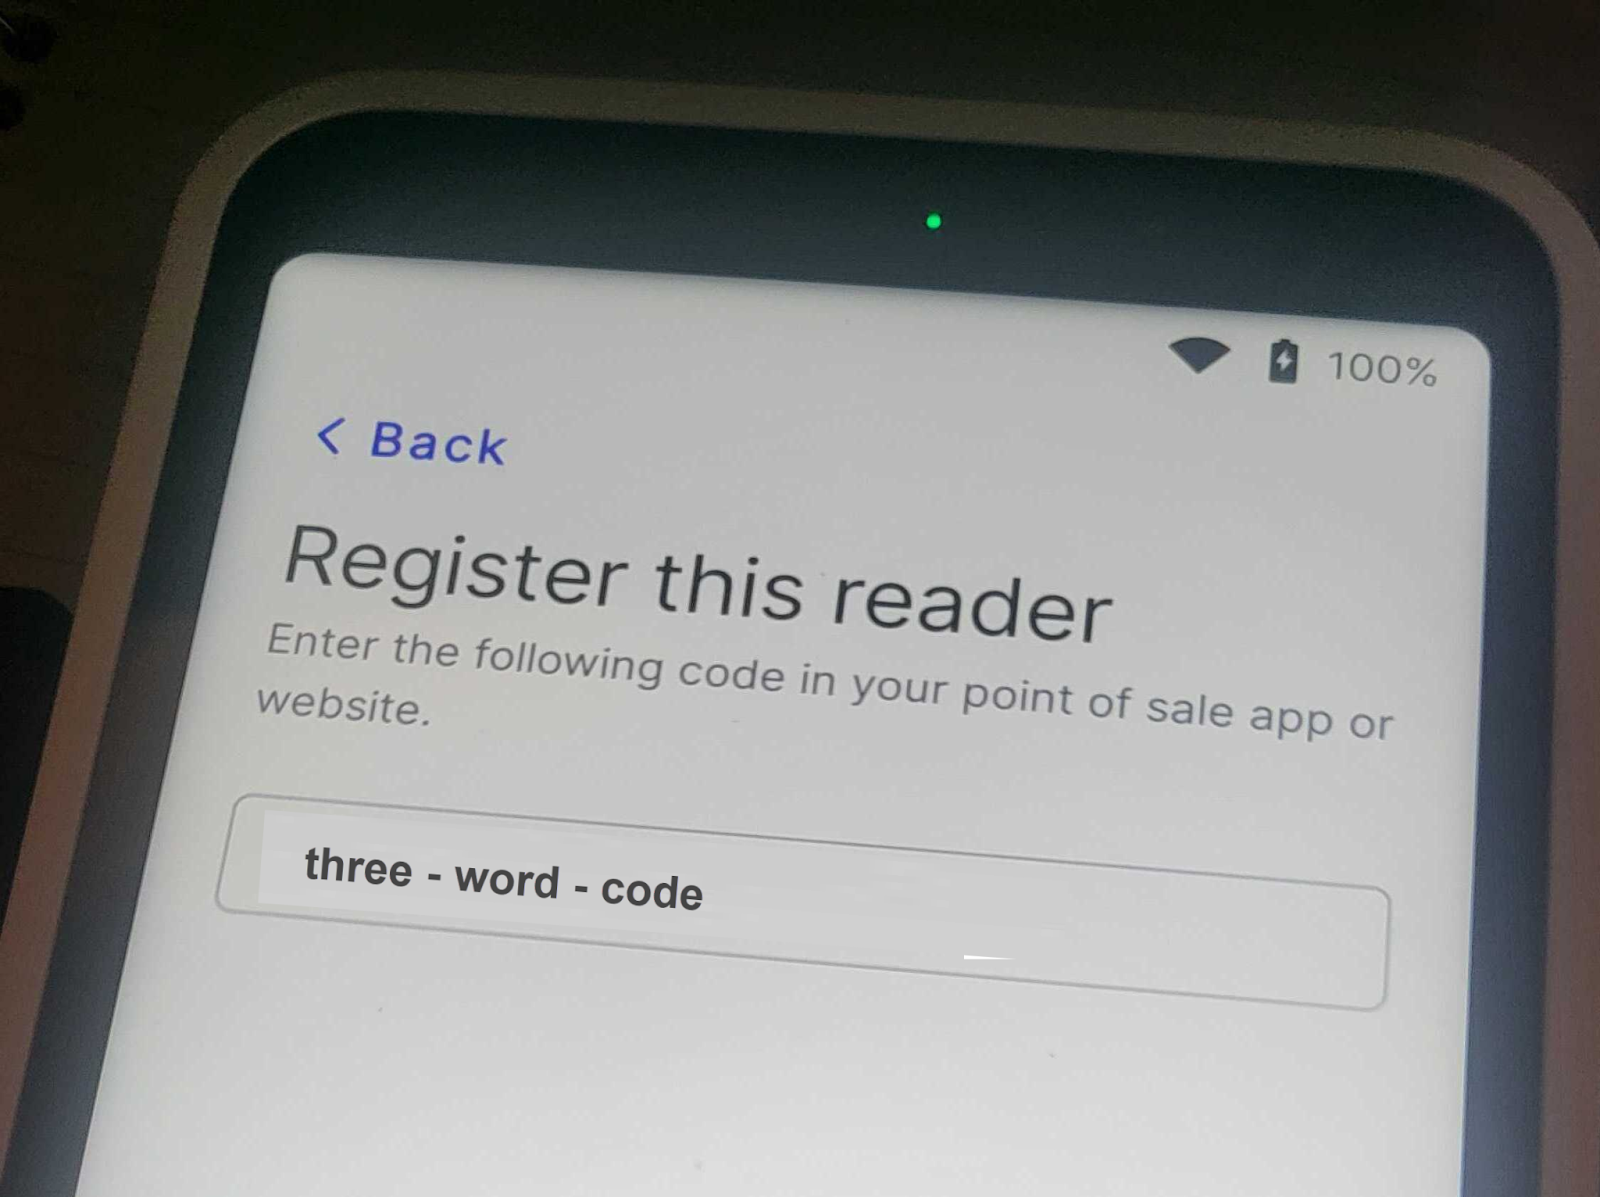
As part of the initial setup, your device should be displaying a three-word code for use in this activation step
-
Type the three-word code, as displayed above, into the “ Enter the registration code displayed on the reader” section of the “Add Reader” interface within Core.
-
Your device will be registered via our API connection to Stripe.
-
Core will provide you with a success message and you will see your terminal listed here:

-
Your reader will go through a lengthy update. One complete, you’re now ready to collect a payment!
Collecting payment
-
Make sure your reader remains connected by ensuring it is charged and is connected to the internet.
-
To execute a payment in Core, navigate to “New Sale”
-
At the checkout screen you will be presented with a new Payment Type option, “ Terminal Stripe”
-
Once “Terminal Stripe” is selected as the payment option and the app is ready to collect a payment, your customer will be able to insert, tap or swipe their card/device.
-
After collecting the card details, the app will process the transaction and let you know if it was approved. This might take a few seconds.
Troubleshooting & FAQs
To begin troubleshooting, use the following common scenarios to help diagnose the issue.
Checking connectivity
To check connectivity, navigate to settings, then select Wi-Fi settings. This will display all available Wi-Fi networks. To see more details about the connection, tap on the connected network name.
-
Make sure the network is connected and has internet access.
-
The signal strength is good.
-
The device has an IP address assigned.
-
The subnet matches the one that your application is connected to.
Problems updating
If your reader doesn’t update, it’s possible that it can’t connect to Stripe. To check its connectivity to Stripe, go to settings, then select Diagnostics. This displays a list of troubleshooting tests. Check Stripe connectivity and ensure it says “Passed.” If the Stripe connectivity test fails, please follow these steps.
-
Router networking:
-
If using a router, please refer to your router’s manual, and reconfigure the networking setup.
-
-
Reader has IP address, but is unable to communicate with Stripe
Here are some common reasons why this happens with corresponding troubleshooting steps.-
Stripe endpoints cannot be accessed:
- Check your computer’s firewall/denylist.
-
The network source is not connected to the internet:
- In the case of bridged connections, ensure that the selected source is connected to the internet.
- In the case of router connections, refer to your router’s documentation to restart the network.
-
-
Reader has IP address and can communicate with Stripe, but not with your point of sale application
-
Make sure the device running your point of sale application and your reader are able to communicate over the local network (typically this means they should be on the same subnet).
-
Stripe Terminal requires that both the point of sale application and the reader be able to interact with specific domain names, all of which should be allowlisted on your network.
-
Stripe Terminal also requires that your reader be assigned an IP address in one of the private IPv4 address blocks.
-
Some DNS providers block DNS resolution of local IP addresses. You can check whether DNS resolution is successful by going to settings and selecting Diagnostics, and checking the DNS resolution test results. Stripe Terminal uses the partially qualified domain name *.[random-string].device.stripe-terminal-local-reader.net which resolves to the local IP address of your BBPOS WisePOS E. If your DNS provider blocks local IP resolution, change your network settings to use one of the following DNS providers:
-
-
Cloudflare DNS (1.1.1.1 and 1.0.0.1)
-
Google Public DNS (8.8.8.8 and 8.8.4.4)
Frequently Asked Questions
- General Stripe Reader S700 Information:
https://d37ugbyn3rpeym.cloudfront.net/docs/terminal/S700_Product_Sheet_legal_0240314.pdf
- Advanced Network Settings
https://support.stripe.com/questions/bbpos-wisepos-e-stripe-reader-s700-advanced-network-settings
- What is the Admin Pin?
https://support.stripe.com/questions/what-is-the-admin-pin-for-the-bbpos-wisepos-e-or-stripe-reader-s700
The Admin PIN is 07139
- I cannot connect to the WisePOS E device over a WiFi connection
https://support.stripe.com/questions/stripe-terminal-application-cannot-connect-to-wisepos-e-over-wifi-connection
-
How long does the battery last?
With a full charge, you can expect the battery to last about 15 hours.
- Can I change the UI appearance?
You can change the appearance of the UI to use a different theme in the settings menu. Go to settings, then select Appearance, and select a new theme from the dropdown.
https://docs.stripe.com/terminal/payments/setup-reader/stripe-reader-s700#change-the-ui-appearance
- Screen timeout?
The screen times out when the reader isn’t connected to a power source. The default timeout of 1 hour is to improve battery performance. To update this value, go to the settings, select Appearance, and then select a new screen timeout from the dropdown. The device screen turns on automatically when a device interaction occurs (such as touching the screen) or payment is requested.
https://docs.stripe.com/terminal/payments/setup-reader/stripe-reader-s700
- I want to know more about PCI compliance and E2EE; what does it mean for Hapana customers?
Proper implementation of Stripe Terminal reduces your scope of PCI obligation, and Stripe pre-fills a SAQ-C that will be available via Stripe dashboard.
With Terminal, card data is encrypted when it’s presented to the device. Stripe’s solution uses end-to-end encryption to ensure Hapana’s application never sees unencrypted card data. Stripe’s PCI auditors found that: “Stripe E2EE is a robust solution that can be used by customers to dramatically reduce both risk and applicability of PCI DSS controls.”-
Stripe is certified as a PCI Level 1 Service Provider, the most stringent level of security certification available in the payments industry. You can verify our certification here.
-
Stripe processes 100s of billions of dollars, for millions of global businesses, annually.
-
89%+ of US adults have made a purchase via Stripe.
-
Stripe has an 99.999% average uptime, meaning you can feel confident your payments will go through.
-
- What is the cost of a card reader?
Terminal Pricing: $349USD | $499AUD
Monthly Fee Per Terminal: $20USD | $35AUD
- How do I order card readers?
Please complete this order form or reach out to your dedicated Account Manager if you have further questions.
- What payment methods are supported on Terminal?
-
US: Visa, Mastercard, AmEx, Discover
-
CA: Visa, Mastercard, AmEx, Interac
-
UK: Visa, Mastercard, AmEx
-
AU: Visa, Mastercard, AmEx
-

